Saturday, April 23, 2016

Opps

Welded one tongue bracket in wrong hole.
Have to cut off, reposition and reweld.

REAR SPRING MOUNTS

Notched for axle flip
Removing folding/caster mount
for weight  reduction

Clamping springs prior to unbolting not necessary.
They don't unload and go boing.
Removed locating pin. Taking out small spring.
Clean rust and scuff entire spring prior to an extra coat of paint.
Flip locating pin over. reassemble with double nut/lock washer
and Locktite.
Found this 3" x 1/4" Hard Rubber washer
in my junk drawer. Watch.


Well greased and installed should remove
slack and spring play rattle.
One leaf removed.
Locate pin reversed.
Extra paint.
Will both and weld to frame.
Not changing wheelbase. With this light weight
it shouldn't be necessary.

Wednesday, April 20, 2016

FLIPPING THE AXLE

Smooth weld beads so spring hanger angle iron
sets flush on frame. Thick grind wheel.
Picture here upside down:
Axle will be repositioned above spring lowering
trailer approximately 3 inches.
Mild steel cuts EZ with thin cut wheel. I 
wear googoo glasses and hearing protectors.

METAL PREP

5 STEPS METAL PREP
smooth welds
wire brush loose paint and rust
clean with lac thinner
rust sealant spray
auto primer
I've scuff sanded all parts, only have to 
prime bare metal.
Final coat will be bedliner, probably thinned
10%-15% and applied with short knap mini roller

Tuesday, April 19, 2016

FIRST TRIP TO WELDER

We're off to see the welder
The wonderful welder of Oz
Oh what a wiz of a welder he is
If ever a welder there was

If ever a whiz of a welder there is
The wizard of weld is one because
because....because...because
because of the wonderful welds he does

My buddy Jil helping me set up. Used the other HF
trailer as a portable jig table.

REINFORCE AXLE

Think I got some good extra strength for very weight and
effort. Got idea from Franco at tnttt.com forums.
Use die grinder with cutoff blade to remove axle pin locating
boss. Grin smooth. Found some 1/4" wall aluminum pipe
with as perfect inside diameter.. It came from an ab event setup 
company and it's the large pipe they use for those event
tents and canopies they rent. Was bent on end...got it
cheap.
Drilled and tapped three holes to take
up any future slack.
Welder will weld locating boss back on.

Thursday, April 14, 2016

Wednesday, April 13, 2016

clean all burrs well. Bottom one is an old
brake cylinder honing tool and 40 grit.
 Cut slow, very slow. Keep wet and cool. No smoke.
My mix: 1/3 cutting oil / 1/3 trans fluid / 1/3 20 weight
motor oil. Windex to cool the blade. If it's not
messy, you're doing it wrong.

A great carbide tipped hole saw. Sharpenable. Kwik change arbor.

Sunday, April 10, 2016

NO WELD JOINT
Portable MIG welding is very expensive out
in the country. I'm limiting it's use to the
outer, structural parts of wall frames and 
the interlacing member (Non-stress) will
be this method I've devised. Took some time to set up but goes very fast in production.
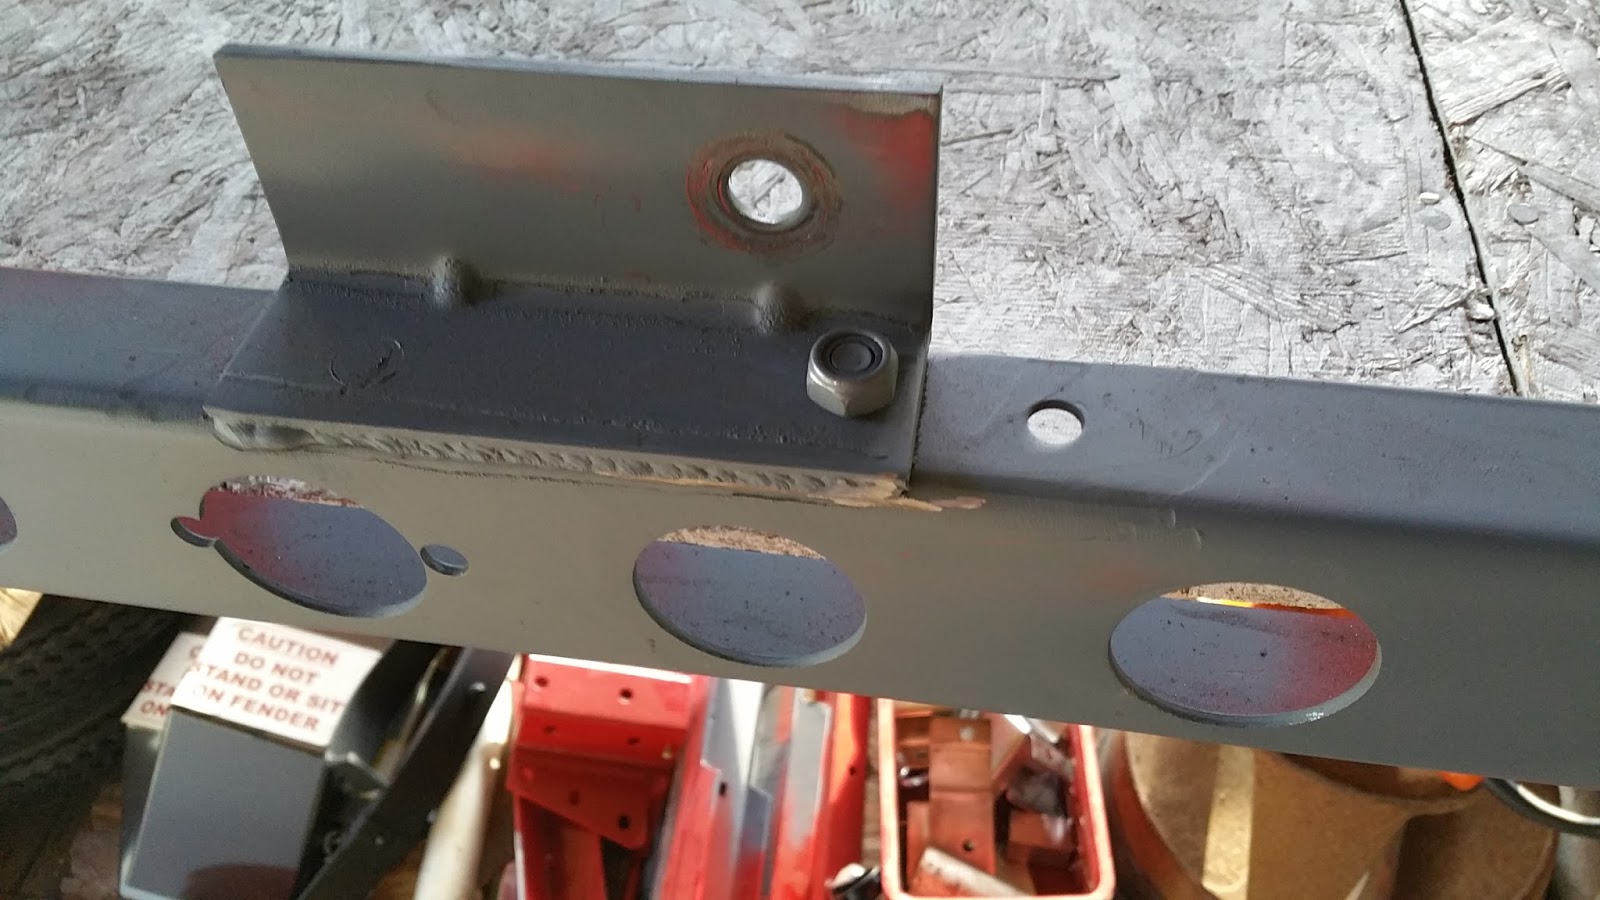
Drill and counter sink holes in mainbeam. The pink
hole strattle jig made for tooling used here to center.
Countersink below surface. Note I'm using Torx
screws that are 1" longer than tubing.
Using 1/8th cutoff wheel, cut notches on opposite
side of upright. Notice stop plate to make depth from end uniform.
Clean burrs, square end and camber
bevel all four edges.
Clamp to jigging square (tooling)(I use 2" Kwik clamps), make a bunch of 
1" x 1" x 1/8th squares to act as cinch nut.
Align and tighten.
Clean joint surfaces well with lac thinner.
Heat joint with propane (cheaper). Braze
with MAPP gas (hotter) (Home depot)
Aluminum melts at 1100 degrees, braze rod
(Home Depot)at 600. Do a side and allow to cool.
 Working around all all 4 sides continuously allows
residual heat to melt aluminum. I made the insert
nut plate larger here to illustrate it coming thru.
The rest are flush fit. After cooled, remove screw, coat
threads with locktite and reinstall....tight!!


Saturday, April 9, 2016

Harbor Freight 6" metal Chop Saw. 1/16 abrasive cutoff blade for cutting. 1/8th for
notching. I'm told a carbide tipped metal cutting blade in my regular 10" chop saw would cut faster and better. I'll try it. Want very square cuts.


First rough layout. Upside down. Many lightening mods to follow: replacing heavy cross members with aluminum, removing unused mount tabs, hole saw drilling, welding all joints/seams. Just the bag of bolts is over 5 #'s. I think I can remove 30-40 pounds.
The parts to a big boys do-it-yourself erector set. 279 pounds. Hope to reduce it by about 40-50#. Built to 1720# specs, I need only 600#. The can is a gallon of roll on bedliner material.
Needed to build some of my own tooling. a 1" x 1" right
angle for perpendicular clamping square and the pink thingy is
a strattle die for drilling perfect centerline holes. You'll see them later.
Need a layup-jig table. 5' x 9' OSB scraps. Not perfect level but with jigging it'll work. Painted white....can draw on it.
April 3rd. Starting the Teardrop build today. It's going to look something like this: 4' x 8' x 5' tall, aluminum and structural foam on a Harbor Freight frame kit. Goal: 500#/550# loaded. Doing it all myself. Minimal welding involved. This will be my build journal.